Tuesday, December 17, 2013

Moving ~ Purging ~ Reorganizing

To continue my series of catch-up post, I spent about 2 months this summer moving rooms around, purging and reorganizing.

The room above the garage was a play room for my 2 sons. The older they got, the less time they played in that room. Their toys became gaming toys instead of cars, transformers, trains and super heroes.

My sewing room was a bedroom, (without a bed) made into a craft/sewing room. I decided to move the sewing room to the room above the garage and make the sewing room to what it was originally intended - a bedroom. This meant lots of purging. I ask the boys what toys they wanted to keep and there were some I wanted to keep too. They helped me put the parts and pieces together and we either boxed them to keep or boxed them to give away.

I hate showing my mess. The photo below is the beginning stage of sorting and purging the toys.


This is the after photo, with my sewing arrangement.


The cubicles that I had toys in, made for great organizing units for my fabric! They were moved to this wall from around the window. All cleaned out of toys.


Here's a photo with it loaded with fabric! (Sorry for the stuff on the floor. I was still working on it when I took the photo.)


This toy organizer makes a fantastic UFO / project organizer! The bins are all full now!


This toy made the cut and didn't get put in the giveaway box!


The room that was my sewing room was a mess too and needed to be purged and organized before it could be made into a bedroom. It was a lot of hard work. It was a little emotional going through everything. I worked on the rooms after work each evening when I really didn't feel like it. So often other things get in the way of me actually finishing a project, I was determined to finish this! I love the way the rooms turned out! I love my new sewing space above the garage! I love the 'new' bedroom and having the extra bed for guests!

My next post will be about a fall sewing retreat I had with my Mom and sisters!

Blessings!
Gina

Sunday, December 15, 2013

Fruits of my labor - Summer Garden

To continue my series of catching up, I want to share my garden photos with you. I know that everyone is thinking about Christmas because I am too! You're checking your list, decorating, buying and making gifts and a post about gardening is the last thing on anyone's mind! Maybe an off topic distraction will be good to think of preparing for a garden after the new year.

This is my first garden, a keyhole garden, you can read more about it from this post. I really enjoyed tending to the garden and I learned a lot! My sister in Texas also had a garden this year and we enjoyed figuring it out together. There was lots of browsing the internet and sharing information and cheering each other!

Here's a photo of my irrigation system using a sprinkler hose.
 
 
I learned about bad bugs.
 

I learned about good bugs.

 
I learned about good bacteria and bad bacteria and bacteria spores and hookworms on tomato plants and much more. I kept it organic, using soap spray and milk spray and picking off those darn hookworms. There's still so much more to learn! Below are a few photos of the fruits of my labor.


I'm looking forward to having a garden next year! Do you garden?
 
Blessings!
Gina

Saturday, December 14, 2013

Where I left off

I didn't mean to go so long without blogging and want to pick up where I left off. Way back when - I won a few giveaways, I thanked each person individually, but really wanted to blog about it too.

First

I won this awesome charm pack from Suemacseeds. Sue's original post from the giveaway is here. When you have time, check out her blog, she is very talented!


Second
 
I won crayons and Thangles from Dancing Thru-Threads. Sharon's original post from the giveaway is here. Crayons? you ask. Yes! be sure to check out her technique using crayons! Pretty neat! While you're at it, be sure to check out Sharon's blog. Another talented quilter!
 
 
Third
 
I won Dutch handkerchief's from Stekje. Pauline's original post about the giveaway is here. Be sure to check out her blog she is very talented also.


Thanks so much for stopping by and still following me after being absent for so long. I read your inspiring post everyday! More blog posting catching up to do! Feels good to be back!
 
Blessing! 
Gina 


Monday, May 20, 2013

Prayers for Moore, Oklahoma

 
Praying for the families and first responders in Moore, Oklahoma


Thursday, April 25, 2013

Bloglovin and Ladies' Luncheon

In case you would like to follow my blog via Bloglovin, I have added the button on my sidebar. Thank you for following me! You inspire me all the time, I hope that I give some inspiration back!

According to Bloglovin, I'm to post this link to claim my blog:

 
I hope you are having a fantastic day!
 
This is a photo of items I received at the Spring Ladies' Luncheon at my church. It was great and refreshing to be able to fellowship with the ladies.
 
 
The theme was 'No Ordinary Cup of Tea'. The breakout sessions were as follows:

1. What's in your tea bag?
Are you a strong cup of tea? Are you a good strong Christian, full of the word?
Are you a weak cup of tea? You may look the same (as a strong cup of tea) but you have less quality in the word; less confidence.

2. Refreshment for a Stale Cup of Tea
Don't get stale in being a servant. Get off the shelf and get busy being used!
Wrap yourself up in God's protective wrapping.

3. If it's Bitter, Don't Drink it!
Bitterness and anger can consume you! It separates you from God.
'Sinful bitterness; it's not for me
Sweet like Jesus; I choose to be'

4. Tepid Tea: A Big Disappointment
Are you a tepid Christian?
Are you fire hot for the Lord?
 
Blessings,
Gina

Tuesday, April 9, 2013

April Showers Mug Rug Blog Hop - Day 2

Welcome to day 2 of the April Showers Mug Rug Blog Hop and welcome to my blog! Wow! Day one had a lot of awesome mug rug inspiration and the rest of the hop is sure to amaze us! Please note that the blog hop button shows the schedule from April 8th thru the 16th but it runs through the 18th because there was such a huge participant response. We get two more days of mug rug inspiration!
 
Thank you to Madame Samm at Sew We Quilt and our cheerleader Erin at Sew at Home Mummy! If you don't already follow these two wonderful talented ladies, I recommend that you follow them as I know they will inspire you!
 
The theme for the April Showers Mug Rug hop is anything that inspires you for the month of April. What inspires YOU? Easter comes to mind, flowers, warmer temps, getting the garden ready, and kites. There is an open lot near my work that is perfect for flying kites. I always enjoy watching the big kites with long tails, so I made a kite mug rug!
 

I followed this kite tutorial. Mug rugs are a great way to try new techniques. The wind stitching was new to me. I tried FMQ at first and it came out horrible. This attempt was with my walking foot. (I picked out the swirl that's under the green ribbon of the tail and forgot to take a new photo)
 

It was a nice day to fly a kite when I took this photo but instead I sat out on the porch enjoying the warmer weather, a glass of sweet tea and a cosmic brownie!
 
Next up are flowers along a picket fence!
 

I used this picket fence design and created my own flowers and leaves.
 
I brought this one to work with me..
 
 
and enjoyed using it for my afternoon snack of fruit and Sweet Leaf Sweet Tea. I love the Grannyism that was in the lid of this bottle!
 
 
'Smile - it makes people wonder what you've been up to'
 
Finally, butterflies should be emerging soon!
 

The wonky butterfly block is really fun to make! I followed this tutorial to make the butterfly. I used the charm square instructions and then cut the measurements in half to make a mini butterfly!
 
 
Thanks so much for stopping by! I really had a lot of fun! Please stop by the other talented quilters on the today's schedule! Their links are listed below! I know they will inspire us with their creativity!
 
Have a blessed day! ~ Gina
 
TUESDAY, APRIL 9th
Gina @ Sew Much and More - you are here
Sharon @ Vroomans Quilts
Theresa @ Bumbleberry Stitches
Jennet @ The Feathered Nest Studio
Patti @ A Yankee in Queen Liz's Court
Gene @ Gene Black - Alabama Artist
Susan @ Susan's Scrappy Domain
Bente @ I Like to Quiltblog
Deb @ Quilting & Other Craft Therapy
Megan @ AnnieOak Designs

Thursday, April 4, 2013

April Showers Mug Rug Hop!

I'm so excited to be participating in the April Showers Mug Rug Hop! Another fantastic blog hop brought to you by Madame Samm at Sew We Quilt and Erin at Sew at Home Mummy. Visit their blogs every chance you get or better yet become a follower, they are sure to inspire you! The hop is scheduled from April 8th - 16th.  
 
 
I'm scheduled for Tuesday, April 9th! My sister DeAnna at Georgia-Girl Quilter is also participating and she's scheduled for Monday, April 8th!
 
See you then! Thanks for stopping by! Have a blessed day!
 
Gina

Saturday, March 30, 2013

Non-sewing Project - Keyhole Garden

It's Saturday Sharing Day at Pigtales and Quilts - a linky party to share what you like! It doesn't have to be quilting related! Today, I'm taking the 'it doesn't have to be quilting related' route! Click here to check out what everyone else is up too!

Hello! I wanted to share with you my non-sewing project - a keyhole garden. Have you heard of it? You can read about it here and here.  My sister, Simone, told me about it. In summary, (I can be wordy, so hopefully I can summarize it), it's a circular raised garden bed, with a center compost basket. A notch, or pie-shape, is cut out of the circle for easy access to the basket. The compost basket is a place for you to drop in kitchen waste, grass clippings, rotting wood, water, etc. As the items compost and you add water down through the basket the composting nutrients will leach out into the garden soil. 
 
I'll explain more as I show you my photos.
 

It's nearly impossible to dig in our rocky ground. I always wanted a vegetable garden and I know the solution to having a garden on rocky ground is a raised bed. Making a raised bed would mean getting my husband involved and well he's a wonderful man but I knew he wouldn't go for it.
 

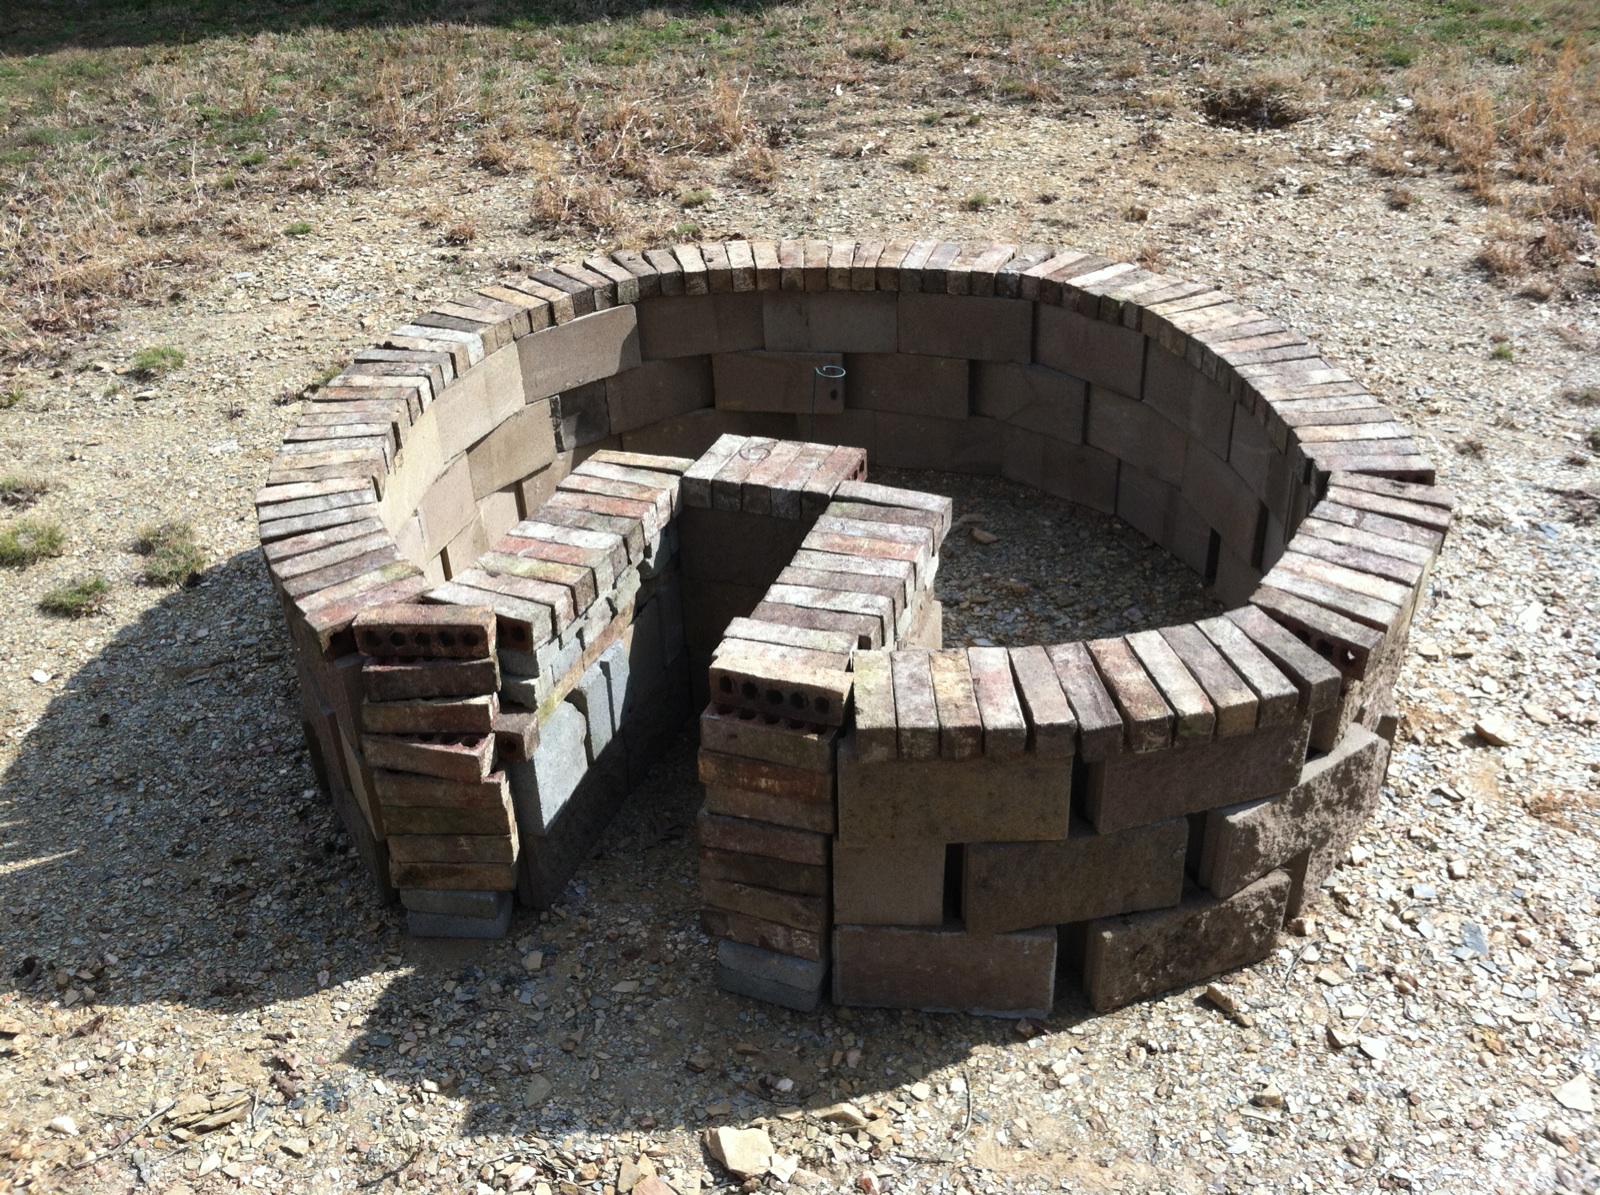
The picture above is a 6ft diameter circle which is the outline of the garden walls. In learning about how to build a keyhole garden I read you can use different materials such as cinder blocks, bricks, stones whatever material you might have on hand.


We still have plenty of building materials leftover from when we built our house and I thought, I can make this! Naturally, where we had the cinder blocks stored was on the opposite side of the property from where I wanted to build the garden. My husband was very helpful by loading them in a cart behind the 4-wheeler. He scattered them around the garden area for me as I constructed the walls.
 

Garden walls... done! The reason it's called a 'keyhole' garden is because looking at it from the top, it looks like a lock.. a hole to put a key.. a keyhole.
 

Yea! I did it! The compost basket will be in the center, behind where I'm standing. The notch allows me easy access to the basket. The circular shape allows easy access to the garden and the raised bed will make it easy on my back!!
 

The instructions say to line it with cardboard and generously wet it down. This is for a couple of reasons, the cardboard will act as a seal for the walls and it promotes the bugs needed to breakdown everything. (the basket is still missing)
 

I finally made the basket! It was a little bigger than I planned but it will work just the same! I'll drop the kitchen waste, grass clippings, rotting wood and water in the basket.
 

I started layering different materials. You are seeing old grass clippings here, but under the grass clippings are cardboard boxes from soda cases, cereal and snack cake boxes, and beer boxes. I was calling it the 'dumpster' garden because that's what it looked like and I didn't want you to see that photo.
 

On top of the grass clippings is a layer of newspapers. I wet down each layer.
 

A layer of compost I had 'cooking' in another part of our property.
 

On top of the compost is another layer of newspaper and then a layer of leaves.
 

Ok, here are the leaves after I wet them down.
 

Another layer of newspaper and some rotting wood and a little dirt from old plant pots. This is where I had to stop because we went on spring break vacation!! The weather has been cold and/or rainy and/or the wind has been blowing like crazy since we got back. I still have more old grass clippings and compost and leaves I can layer. The top 6 inches should be filled in with soil and should be mounded and taper down to the sides.
 
It's been almost 2 weeks since I've been able to add compost materials to the garden, I hope what's there is starting to compost and break down and settle a little. Actually I can see that it has settled some. Then when I add my final layer of soil maybe it won't sink in as much.
 
I'd like to plant tomatoes and summer squash and some herbs. There's a good chance I'll have a problem with deer eating the garden, but I'll deal with that when it happens. I've been reading up on deer, and raccoons eating the garden. Once I get the veggies planted I'll post about it so you can see it finished!
 
Do you have a vegetable garden? I would love to hear about it (and learn from you).
 
Thanks for stopping by!
 
Blessings,
Gina


Wednesday, March 27, 2013

I'm (a little) Behind!

Well, I'm (a little) behind with my February and March UFO's, WIP's, sewing projects, and blog posts. I started out good in January and then ... well life happens. Isn't that how it usually happens! We make those January goals, or goals at any time and there always seems to be challenges in getting them done. I am not complaining but very blessed and grateful that the life happenings haven't been bad, just busy.. working late, track and spring football practice for J1, and soccer practice and games for J2, and spring break vacation. (Ahh! a much needed vacation!)
 
I wanted to share with you what I made in February, which was not on my original sewing project list. The youth group at my church host a Valentine's Banquet each year. Due to scheduling conflicts, it was a little later, February 23rd.
 
The youth group serve the food to the guest and they also provide entertainment. Let me add there are lots of adults in the background that plan, cook the meal, and direct the teens on what to do. The teens do a great job serving, refilling drinks, picking up dirty dishes and then prepare for and entertain the audience. The entertainment was a 50's Soda Shop theme. Usually we don't ask the banquet guest to come dressed to match the entertainment but this year they did encourage everyone to come dressed up 50's style.
 
The thought of making a poodle skirt crossed my mind but I was busy ... see paragraph one. As usual I waited until nearly the last minute to decide to make a poodle skirt. I gave myself 6 days. Sounds like plenty of time but not with my schedule of not being able to work on it every day.
 
I bought the McCall's M5681 costume pattern and picked out a pretty purple broadcloth. Oh! I haven't cut out pattern pieces in years and I got busy cutting and pinning.
 
Speaking of cutting let's cut to the chase and show you some photos!
 

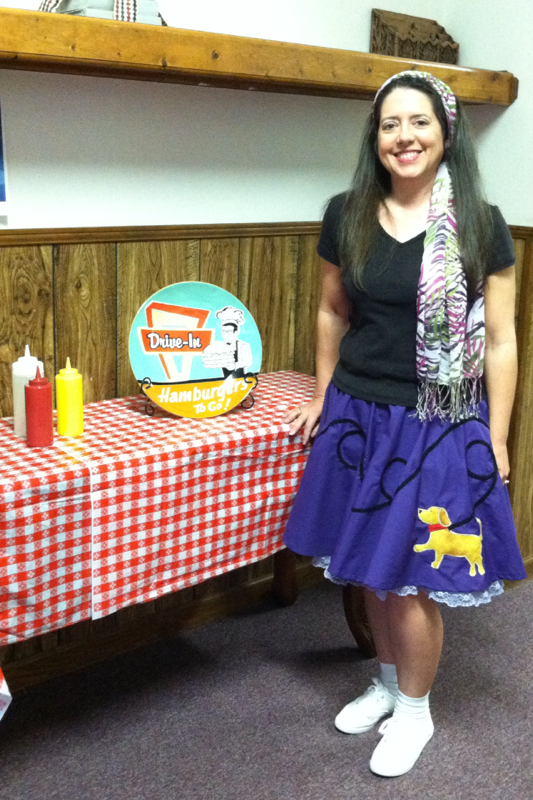
Finished 2 hours before the banquet!


Instead of using one of the applique designs that came with the pattern, I added a little more stress to my life by customizing an applique that resembles our dog Marley. My oldest son helped me with the customization to help make it look more like Marley. It was worth the extra effort and definitely made the skirt unique.


 Marley is part Labrador and part Basset Hound. He looks like a Lab with short legs. He has a long Basset muzzle and the length of his ears are in between a Lab and a Basset. Our vet who is also a friend and member of our church calls him a 'LabraBasset'.


The costume came with a petticoat pattern. I wasn't sure about it at first, but I'm glad I made the petticoat!


Here's a photo of it blowing in the wind and the petticoat behind the skirt. I wanted the lace of the petticoat to fall just below the hem of the skirt, so the pretty lace could be seen.


Finally, here I am sporting my 50's look!
 
Thanks for stopping by! Even though I've been too busy to publish a post, I have been reading your post and as always ... you continue to inspire me!
 
Blessings,
Gina


Tuesday, February 5, 2013

Denim Finishes

Hey! I realized I had some denim finishes that I haven't showed y'all! First up is the denim quilt I made from my two sons jeans they are no longer wearing. I have been saving the jeans for quite some time! This quilt is made from boys sizes 8's and 10's. When I came across this tutorial I knew this is how I wanted to make the quilt! I originally posted about it here.
 

I love the different shades of blues and the look of the worns knees!
 
 
I found a flannel for the backing that has owls in blues and greens. I think it goes well with the denim. I love snuggling under this quilt! 
 
The next demin quilt I wanted to show you is a denim prayer quilt that I made for our church ministry. I originally posted about it here. This went to a dear friend that was scheduled for open heart surgery for a heart valve. I'm hApPy to say surgery went well and he is now home recovering! Praises!!!!
 

This quilt is quite a bit bigger than my first one and heavy too! I love how it turned out .. I just love all the shades of blue!
 
The way a prayer quilt works is there are threads stitched into the quilt and left untied. If you look closely at the photo you can see the untied threads (#5 Pearl Cotton) stitched throughout the quilt. (You can make the quilt a tied quilt, but I like to machine quilt mine).
 
The quilt is presented to the congregation and information about the recipient is given as to their prayer needs. After service it is placed in an area large enough for people to get around it so they aren't stumbling over each other. Each person says a silent prayer and ties a knot in the threads. Knots can be tied on top of knots (prayers on top of prayers).
 
The recipient will then be covered in prayers and they know each knot represents a prayer for them. Usually what happens is once the prayer quilt is given to the person in need, they have family members that say prayers/tie knots into the quilt. I'm also aware of hospital personnel saying prayers/tying knots. The prayers/knot tying aren't only from the church family.
 
You can go here to learn more about prayer quilts!
 
 
I didn't get a good photo of the back, but here is the flannel I used and you can see the label and more of the untied threads.
 

A photo of prayers tied into the quilt!
 
I really enjoy being able to use my sewing talent to serve. Making the quilts blesses me! My goal for 2013 is to make more prayer quilts!
 
If you have been saving jeans and not sure what to do with them, be sure to check out the link I gave you at the beginning of this post for making these quilts. Also, visit Pam at Threading My Way for Refashioning with Denim. There are fantastic ideas listed for recycling denim! 
 
Thanks for stopping by! Sewing to serve!
Gina