Saturday, May 12, 2012

Quiltmaker's 100 Block Collector's Edition Vol. 5

I WON!  Quiltmaker's magazine had a 5 day blog tour of their 100 Blocks Vol. 5 collectors edition. The blog tour was the first week in May so all the giveaways are closed. However, you can start here with day one to check out the designers that participated in the tour. Be sure to look at all 5 days! Wait, I'll make it easier for you, day 2, day 3, day 4, day 5!


I so enjoyed following the tour and learning how the designers came up with the block name or the design. Some gave tips and had lots of pictures showing the blocks in various colorways, and layout setting options.


Quiltmaker's and the designers were giving away the Vol. 5 edition if you left a comment on their post. Sherri at A Quilting Life drew MY name/comment!! Sherri's awesome block is #484, Summer Garden Dream, and is found on page 65.

The magazine is available now, so be sure to pick up a copy you will definitely be inspired. All the blocks finish at 12 inches. There are applique blocks, foundation pieced blocks, mixed technique blocks and pieced blocks, something for everyone! There's also a designer and a tester gallery of photos. Of course there is a pattern pull out section found in the center of the magazine!

Thanks so much for stopping by! I'm off to read, look through, try to decide which one to make first!

Gina


Wednesday, May 2, 2012

Denim/Jean Quilt

I've been saving my 2 son's jeans for quite a while to make a quilt out of them! I bookmarked this super great tutorial to go to when I was ready! They were taking up a lot of room in my youngest sons closet and I finally decided it was time!

In the tutorial, Natalia says to rip the jeans because it's much easier on your hands than cutting them with scissors. I don't know why I was skeptical, maybe I thought I couldn't rip the jeans. However, I snipped the bottom of the leg to get it started, and then I ripped, and WOW she was right! It was quick and easy!  Here's a picture of my stack of ripped jean strips!


I used my rotary cutter to trim them to the desired size. Actually, first I sorted them by size... by the width of the strip. Some of the jeans were boys size 8's and I could get a 5.5 inch width by length of jean. Some are larger boys size 12's that I could cut a 7 inch width strip. Some of the knees had holes in them, so I cut the knees out and those are the shorter strips, which worked out great to help offset the seams!

This quilt is so easy and would go together in no time but that's the problem.. lately I have no time to sew! I am managing to get a little time in here and there and actually making progress!

Here's a picture of the top and I love this picture.. look at those indigo colors! It doesn't look this blue when it's inside!


Since this picture was taken, I added 2 more rows to make it a little longer. It measures 50 x 55.

The picture below shows the flannel backing. I had a hard time finding a flannel I liked.. well that I liked for the boys. I found pinks, purples, florals and young kiddish flannels. I really like this one with the owls!


Currently, I'm straight line quilting it and it's heavy! I'm really excited to get it finished and start another one! 

I'm linking up with Freshly Pieced WIP Wednesday. Be sure to check out what everyone else is working on!

WIP Wednesday at Freshly Pieced


Thanks for stopping by!
Gina

Tuesday, April 10, 2012

A Tie Blanket Prayer Quilt... {Just Because}

This prayer blanket isn't for someone ill physically or spiritually per se, it was made for the recipient 'just because'. It was made for an elderly member of our congregation just because we love him and wanted to cover him in our prayers. We prayed love, peace and strength into the blanket. Wouldn't you still like a prayer quilt when things are going 'just ok'? Wouldn't you still like a prayer quilt 'just because'?


This is a unique prayer blanket for a unique person. The blanket isn't unique in the way it is made but it's not the traditional way we have been making prayer quilts. It's a fleece tie blanket that has been popular for some time now. You use 2 yards of fleece for each the front and back, cut approximately 1 inch or slightly larger cuts around the edges, making a fringe. Then you tie the fringe front to the back and voilĂ  you have a blanket.


When you tie the front to the back, you tie 2 knots just like we do for the threads stitched into our 100% cotton prayer quilts. It actually makes a terrific prayer blanket! This worked perfectly for our recipient! When we asked if he would like to have one, he requested St. Louis Cardinal fabric and Green Bay Packer fabric. That's why I decided to make it a tie prayer blanket.


There's really not a front or a back to this one! We have it folded over for the picture so you can see both sides! I always pray that God uses the prayer quilts as an instrument ... that the recipient can feel HIS presence ... feel the love and prayers tied into the quilt ... and that the recipient will be at peace. I prayed that in this one too.

Thanks for stopping by! Blessings!
Gina

Saturday, March 24, 2012

Shop Hopping While on Vacation - Third Stop

The third stop of my three days - three quilt shops, shop hop is Fringe, located in Salida, Colorado. My family skied for three days and I found three shops in the area of Salida, CO to visit, which is where we stayed. 


Like the sign says fabric - yarn - gifts.  About half the store was fabric, the other half was yarn. There were sections of gifts in between.


A section of the fabric


A section of the yarn


Below are pictures of what I bought!


 Red, white, and blue fabric!


Cat scissors and a pattern to make fabric bins!

I really enjoyed my vacation shop hop!! If you're in the area of any of Buena Vista, CO, Canon City, CO or Salida, CO I recommend that you stop in and visit them. They were all awesome! You can read about the other two here and here. I can't wait to get started on my new projects! Like I needed new projects to start!

Thanks so much for stopping by!

Gina

Thursday, March 22, 2012

Shop Hopping While on Vacation - Second Stop

The second stop I made was in Canon City, Colorado. The shop name is The Creative Cloth Closet ... oh! the eye candy! Take a look at the terrific store front!


The owner Denise, and Bonnie her employee were super nice! (I didn't expect anything less than super nice, especially from quilters!) I enjoyed visiting with them and learning from them! The store was awesome!! There were a lot of projects/inspiration on the walls, and I wish I would have taken more pictures!


Here are some pictures of the shop and some projects too. This is just a very few of the beautiful wallhanging/quilt projects.


A grouping of inspiration!

Below are pictures of what I bought!


                       Fat Quarters!


Three paper pieced patterns and foundation paper and an Add A Quarter ruler. The patterns are from a local designer Faith Wellman. Those are her designs in the 'grouping of inspiration' photo above. I've been wanting to try paper piecing and am so excited to get started on these projects!! Denise took the time to show me how to paper piece and gave me great tips too!


They had this Little Twister wallhanging displayed in the shop. I have a Little Twister and have used it to make a couple of wallhangings. I loved their red, white and blue version, so I bought fabric to make one too!

I've had so much fun on my shop hop! It's not the traditional shop hop of going to many shops in one day. I worked out a schedule to visit the three shops in the area, in the three days my family was skiing. If you are ever in the Canon City, Colorado area, I highly recommend that you stop in The Creative Cloth Closet!

Thanks for stopping by!

Tuesday, March 20, 2012

Shop Hopping While on Vacation - First Stop

My family is skiing and I'm shop hopping! I decided skiing's not for me and Googled 'quilt shops' in the area where we're staying and found 3 shops. Three days of skiing means I get to visit one quilt shop a day!

I drove about 30 miles to Buena Vista, Colorado to visit Bev's Stitchery. Oh! I was in heaven in the Rocky Mountains!


It's such a nice shop and the picture above doesn't do it justice. There was so much more to the store. A section with quilting, knitting and crocheting books. There was even a chair inviting you to sit down to stay awhile and browse through the books, which I did by the way! (Not the black chair at the bottom of the picture, but actually a rocking chair)

There were a group of ladies working on their Quilts of Valor quilts.

Of course I must show you pictures of what I bought! After going through the store at least twice, I decided on these FQ's. I'm really not good at putting colors together which is why I love pre-cuts! However, this is what I came up with. I have no plans for these... granny squares? maybe just stash builders.

Blues


Reds


Blues and Yellows

Sorry the book is a little wonky in the picture. I hardly buy books because there's so many (free) awesome tutorials out there that I want to make! For some reason this book caught my attention and I looked at it, put it down, looked at it again, put it down... went back over and looked at it and decided I should get it!

Below are a couple of pictures of what I saw on my drive to Buena Vista, CO!


Absolutely Beautiful!

Thanks for stopping by!

Gina

Monday, March 19, 2012

Slow and steady... {wins the race}

The Drunkard's Path turtle quilt is finished! I'm very pleased with how it turned out! This is a prayer quilt for a 7 year old boy that has health issues. When I heard he liked turtles I searched long for a turtle design. My initial thought was a turtle to applique, because I didn't think there was a pieced design. I Googled 'turtle quilt block designs' or something similar, and found many applique designs but they didn't seem to fit. When I came across the Drunkard's Path turtle I knew that one was the one to make!


As I was cutting, sewing, and quilting around the curves, the phrase 'slow and steady' kept coming to mind because I tend to go to fast. I hurry to get it done, but I had to keep telling myself to slow down around those curves and you'll get it done ... you'll win the race (the race was my deadline). Maybe this quilt is appropriate for the young boy that will receive it ... slow and steady and he'll win his race/battle!


The way a prayer quilt works is there are threads stitched into the quilt and left untied. You can see the untied threads (#5 Pearl Cotton) in the center of the turtle shells. (You can make the quilt a tied quilt, but I like to machine quilt mine). The quilt is presented to the congregation and information about the recipient is given as to their prayer needs. After service the quilt is placed in an area large enough for people to get around so they aren't stumbling over each other. Each person says a silent prayer and ties a knot in the threads. Knots can be tied on top of knots (prayers on top of prayers). The recipient will then be covered in prayers and they know each knot represents a prayer for them. If there are threads left untied, I let the family know, just so they are aware. Usually what happens is once the prayer quilt is given to the person in need, they have family members that say prayers/tie knots into the quilt. I'm also aware of hospital personnel saying prayers/tying knots into the quilt. The prayers/knot tying aren't only for the church family.

Thank you for stopping by!
Gina

Wednesday, March 7, 2012

WIP Wednesday {3.7.2012}

Drunkard's Path Turtle Quilt


Here's my progress on the turtle prayer quilt.  I had a chance to take a picture outside.


Up close view on how I'm quilting the blocks. It takes about 13 minutes to quilt around the turtle and that was without distractions. I always have distractions, so it takes me longer than 13 minutes. I usually don't like to show up close pictures of my quilting since I'm not very good at it. However it may look, I like the way it's turning out! Mostly, I hope it brings peace and comfort for whom I'm making it.


This is a picture of jean legs that have been torn open into panels. I've been saving my childrens jeans for awhile to make them a denim quilt.  I'm following this tutorial.  Since I've been saving them for awhile I have varying sizes. The piles are divided into 5 inch, 6 inch and 7 inches widths.

Linking up to WIP Wednesday. Be sure to check out what everyone else is working on at 

WIP Wednesday at Freshly Pieced

Thanks for stopping by!
Gina

Saturday, March 3, 2012

Never Say Never - Fuglies

I can't ever say I Never Win Anything because I hit the jackpot on fuglies!

Lucy at Charm About You had a Linky Fugly Fabric Party in early February. You can read the original post here. The idea was to destash.. to get rid of fabric you may have once loved but maybe not so much anymore.  It may have not been ugly, but maybe it was fabric that's been hiding in the back of your stash, fabric you knew you wouldn't use anymore.

I came across her linky party and thought I'd play along and register.. maybe I could win fabric for the prayer quilts that I make. The prayer quilt ministry budget is low and I'm always looking for donations and well, this was right up my alley.

I was so surprised and excited when I began receiving emails that I had won! Of course I want to show you!


I received this beauty from Ella at throw a wrench in the works.


This wonderful fabric is from Irene at Hilachas.


This 7 yards (total) of lovey fabric came from Pat at Color Me Quilty.


These 3 pictures are fabrics sent from Karen at Practically Pippy.


Love that seashell and starfish fabric!


I love those 4 1/2 inch charms.

Thank you ladies, I promise I will make good use of your fabric! I hope you have a chance to visit their blogs. They are very talented ladies!


Blessings,
Gina

Monday, January 30, 2012

Drunkard's Path Turtle Block

I'm making a prayer quilt for a 7 year old that really likes turtles. I searched high and low.. long and hard to find a turtle to either applique or piece. Once I decided on the Drunkard's Path Turtle, I searched my local stores for the plastic templates and came up empty handed. Why do some things seem so hard! (I know sometimes I make it hard!) Time is running short and I needed to get started on this project. I browsed sites to purchase the templates and then remembered I have an old book Quilters For Beginners Patchwork & Applique Projects for All Ages, by Agnes Frank, copyright 1985. It has templates for each of the 20 blocks in the book. This was either before rotary cutters/rulers or before they became popular. I was finally glad to get my hands on a Drunkard's Path template! (I found the book here.)

I was skeptical of using that particular design because of sewing curves and using a template. I probably haven't used a template since I bought this book and made many of the blocks! (The receipt was my bookmark, I bought it February 16, 1989!)  Even though I was feeling unsure (because of the curves and templates) I continued moving forward with it and happy how the first block turned out!


I'm planning to pick the stitches out from around the head and tail and zig zag around it instead.

When searching for templates on the internet, I came across these templates by Marti Michell. I like them the best. I was wondering if anyone has used them? After studying the Drunkard's Path design for the turtle block, it's really amazing how many different designs you can make using those templates.

Thanks for taking the time to stop by!

Have a blessed day!
Gina

Saturday, January 7, 2012

2012 1st Quarter Goals with Finish-A-Long [FAL]

2012 Finish-A-Long

Rhonda, at Quilter in the Gap, has organized a Finish-A-Long [FAL] to get everyone motivated to finish our UFO's or WIP's (whatever your favorite acronym is for unfinished quilting or sewing projects). She has broken it down quarterly and you set your own limit as to how many you think you can complete in the quarter. I'm very excited about the FAL because in 2010 my LQS hosted a UFO Challenge and it was a very satisfying feeling to get my many year old projects completed... finished... done... down to the hanging sleeve and label!

I'm glad I don't have a lot of WIP's but still there are some and I wanted to get on board the Finish-A-Long.  I'm looking forward to that satisfying accomplishment of completing a project! Thanks Rhonda for putting it together and getting all the cool prizes too. Yes! there are prizes too, but the real prize is getting these projects finished!

There's still a little time to join in, if you also want to join!

Here are my projects:

This is a wallhanging, the size is 39 x 39.  It's pinned/sandwiched, however it needs to be taken apart and ironed and restretched, pinned, and quilted.

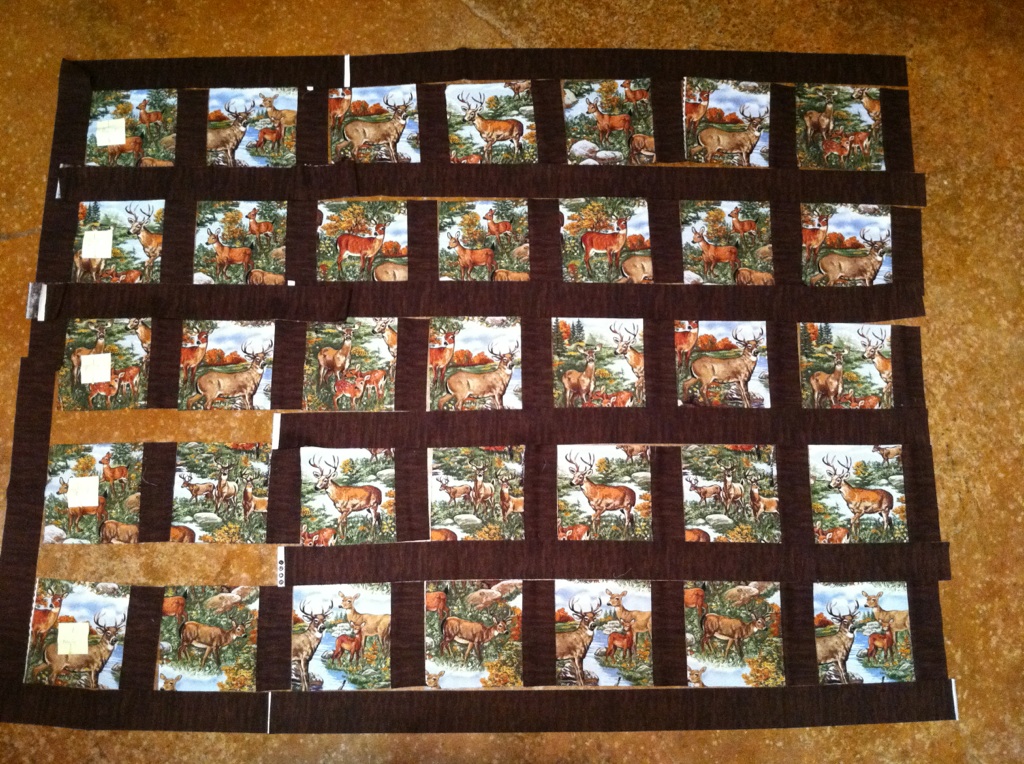
This is a 'blessings' quilt for a newly married couple at my church.  I'm on the committe that makes prayer quilts and we voted to also make blessings quilts.  The couple enjoy the outdoors and I thought (hope) they would like the deer print fabric. I fussy cut the squares into 6 inches and as you can see, plan to border it with the brown fabric. More brown strips needs to be cut, and the top needs to be sewn together, the backing needs to be pieced, sandwiched and quilted. The size will be approximately a lap size quilt.

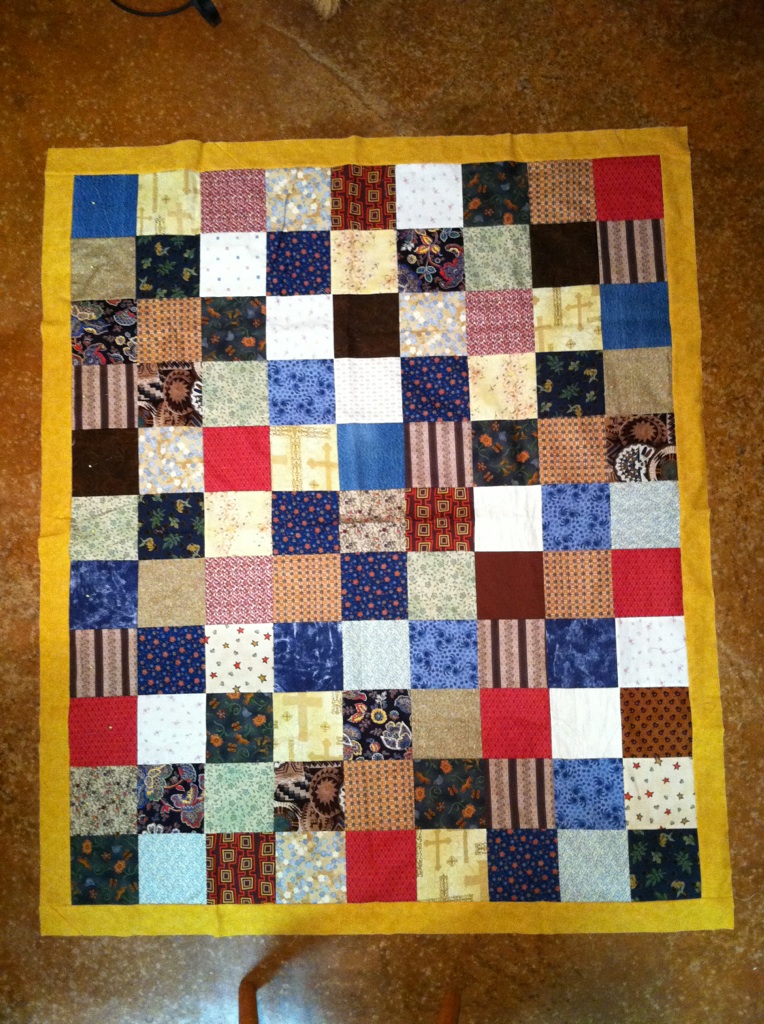
Last up is a prayer quilt. The size is approximately 49 x 59. The backing needs to be pieced, it needs to be sandwiched and quilted.

Three months, three quilt projects.. it sounds easy enough, however I'm already a little worried because I'm getting this post and link up in just under the wire! I hope that's not an indication of how my finishes are going to be at the end of the three months!

Happy Sewing and many blessings to you,
Gina

Monday, January 2, 2012

Catching Up!

Hello blogging friends! I have missed y'all! It's been a busy few months, as I'm sure it's been for you too! Work has kept me away. Working long hours on a project, left me too tired to sew or blog. After the project went in, I started on my handmade Christmas gifts. When you work, take care of family matters, don't get to sew until after 9:00 pm, stop around midnight, start over the next day; well, it leaves a person tired!

Enough of all that though, I'm glad to be able to post today and to catch up on what everyone has been doing! I'm excited to show you what I've done!

First, an update on the raffle quilt! I was very excited to learn that it raised $1,093.00 for the family! I'm speachless!

Here we go..... (I apologize that my pictures aren't the best.)


I made two quilts; one prayer quilt (above left) and a cat quilt (above right). The cat quilt was a Christmas gift for my aunt who loves cats! The backing fabric was a cat paw print design!

I made my Razorback/LSU tie quilt in the summer and had it with me during the annual Friday after Thanksgiving game. LSU was ranked 1 and Arkansas 3.  Whoever had the ball, I had their logo on top.

I'm in a divided house between the two teams. I pull for Arkansas when they aren't playing LSU. It's always fun being with my LSU family and my
Razorback family during the game!

The charm tote, pictured on the right, was a Christmas gift for my sister in Texas. The pattern is a Whistlepig Creek Productions design and the fabric is Curio by Basic Grey.


One of my new favorite websites to visit is http://sew4home.com/. They have awesome projects! I found this Slouchy Book Bag pattern that I made for two of my nieces. The green one is for my niece in Baton Rouge, and the brown one for my niece in Texas.  They used corduroy but I used Duck Cloth. It has a cord closure that wraps around a button. It sewed up quickly. They named it 'slouchy' because it doesn't have interfacing or fusible fleece and no sturdy bottom that would give it a more defined shape.


The next bag I made is a Quilts Illustrated Mini Messenger. I actually made one for myself (not pictured). The one on the left was for a niece in Baton Rouge and the one on the right I made for my Mom.  


For my niece in Texas I made this flat iron travel case. It's a design I had in my head from different travel cases that I've seen. As you can see in the picture to the left the case is closed with the flat iron inside and the cord in an outside pocket. Then you pull it apart to open it and it becomes a 'hot pad'; a place to lay your flat iron while it's hot. You could then close it, if you needed to take it with you while it's still warm.

Now, I can't wait to catch up on what you've been doing! I look forward to learning from you this year and getting to know you better! I know you will inspire me, you always do!

Blessings,
Gina